
Column: There’s no place like home – your home studio simplified
Weekly insights on the technology, production and business decisions shaping media and broadcast. Free to access. Independent coverage. Unsubscribe anytime.
Social distancing, working from home, Zoom meetings – all new territory for most of us, creating new challenges.
Whether you’re doing a video chat or a broadcast remote from a home studio, the world sees you essentially in a close-up shot. We all want to look our best, after all it’s our brand. One of the easier ways you can make a difference – or crash and burn – is through lighting.
I spoke to an expert, our Director of Photography at Angry Badger Productions and these are his Pro Tips to follow when setting up your Home Studio or at least to make improvements in your current set up. His top ten topics are:
- Color Temp
- Illumination Level
- Camera Sensitivity/Dynamic Range
- Contrast Ratios
- Manual Controls
- Camera Support and Placement
- Monitoring
- Framing and Composition
- Connectivity
- Prompter
It’s a long list, but even if you master the first two, you’ll make a huge improvement!
1) Color Temp
All light sources must match as closely as possible. They should be the same type of light bulb. Use Interior OR exterior light, but usually not both. Check and adjust settings. Match ambient color temp if possible. If you have lights for video, consider turning off ambient (architectural) lights.
White balance the camera for the light hitting you/talent. iPhones and webcams auto white balance, which is effective when your color temp matches. If available, you can use manual white balance or closeup sample a white card at talent location.
2) Illumination Level

You/talent should be brightest part of scene. Avoid strong backlight and highly reflective or illuminated backgrounds, or your face will appear too dark by comparison. Use drapes to darken the room if necessary. Do not use windows as backgrounds unless you can control light level, avoid reflections and make sure background does not distract from you/talent.
Day time: Use windows with indirect sunlight as key lights (front light). Set camera between window and talent. If direct sunlight, use a translucent shade, bed sheet, wax paper, etc. to cover the window to soften any harsh light.
Nighttime: You may use a view through a window as a background. Make sure you white balance correctly. Be alert for reflections in glass. Avoid shooting straight at glass to minimize light reflections. Check for unintended reflections of activities off set.
To get more light from a fixture, move closer. Halving the distance quadruples the light level. Keep lights close to lens line.
Lights should be placed above center line vertically. Not below – no horror movie lighting!
Avoid reflections in eyeglasses. “Non -Glare glasses” usually refers to the back of the eyeglasses, not the front surface of eyeglass lenses. Raise lights to cast reflections down. Tilt glasses down and if they slip back, use tape around back end of temples.
3) Camera Sensitivity
Make sure you have enough light so that image is not dark or grainy. In a pinch, you can use table lamps gathered around camera. (see placement note above). Or you can use a Ring light or other light especially made for video chats (see below).
An iPad with a white screen produces a surprising amount of light and can save an exterior night shoot.
Be creative but remember not to mix the color temperatures of your light sources.
4) Contrast Ratios/Dynamic Range
Unlike the human eye, cameras (all cameras) have a limited range between the darkest and brightest parts of an image. Do not over light. Exclude parts of the scene that are too bright or too dark. Medium brightness is your friend.
5) Manual Controls
If the camera has manual controls AND YOU KNOW HOW TO USE THEM set white balance and exposure. Adjust exposure compensation if necessary. The best solution is to be as meticulous as possible with lighting and leave the camera on AUTO.
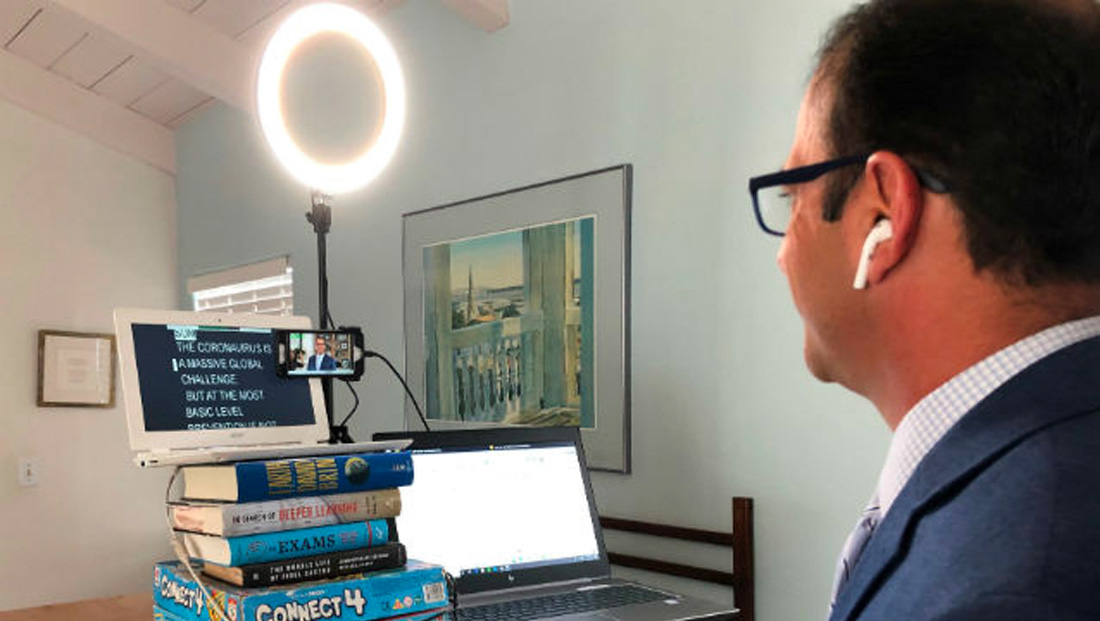
6) Camera Support and Placement

Get the camera above eye level by at least a few degrees. That’s the most flattering angle for almost everyone. Tripods are great if you have one. Microphone stands can be used as well. Stack books, boxes or anything else. You can use tape to attach an iPhone to almost anything.
Keep it as sturdy as possible for safety and to reduce shakiness.
7) Monitoring
An iPad self-monitors better than an iPhone simply because it is bigger but if all you have is an iPhone, use that – or use the flip around view finder on your camera.
If you are live streaming to a media center, ask them to give you feedback on how you look and make adjustments.
8) Framing and Composition
Keep it simple. Home locations should include hints that allow the viewer to know you’re at home, but don’t get carried away – don’t let the background be overly distracting.
You/talent should fill most of the screen. Centered or on a Rule of Thirds point is usually best.
If you are on location as a reporter, include some background and consider walking into the shot after you have established location. That way you’ll be pre-lit for your closeup.
9) Connectivity
None of this matters if you cannot get the video out. If the most perfect shot is in the corner of your garden and it’s too far from your Wi-Fi router to get a reliable signal, you can’t go live, so pick a spot within range of your router.
Consider using an ethernet cable directly to your router so you don’t have to deal with spotty Wi-Fi.
10) Prompter
Most of the time you’ll be winging it. An iPad or another laptop just below the lens can work if you really need script but then you are into a more complex setup and there’s usually more help in setting that up. Paper and Index Cards work as well and never need new batteries.
Gear
Although we do not endorse these companies or items, below are links to tools that are suitable for a home studio and are easy to deal with.
- Three-light kit with stand
- Compact light with great features from Moman
- Super compact light with great features from Supon
- A simple Joby GorillaPod works well in the home, as it can attach to a variety of surfaces
We trust these Pro Tips will be helpful in setting up for your next “close-up:”
–Kathryn Mosher-Boule’ EVP Angry Badger Productions

Angry Badger ProductionsAngry Badger Productions is an innovative production design team, with decades of experience in network and affiliate news, creating one-of-a-kind scenic and lighting designs for broadcast environments. ABP’s approach is to start from scratch, rather than providing cookie-cutter, off-the-shelf designs, with a focus on clients’ needs and workflows, which along with inspired imagination produces results that engage and grow audiences.

tags
Angry Badger Productions, At-Home Production, Coronavirus, Home TV Studios, Kathy Mosher-Boule, Zoom
categories
Featured, Lighting and Lighting Design, Uncategorized, Voices